WATCHING VIDEOS (AND AUDIO) REAL-TIME PITCHED-DOWN TO A4=432HZ
One of the questions that I receive from visiters of my blog is about videos and if there is a way to watch/listen to the videos pitched-down to 432Hz. The short answer to this question is “yes”. But, you will need to do a few things to make this happen. In this article I will explain how-to step by step.
After you have implemented the setting changes as described in this blog article, all video and audio formats supported by the players will be playing with the lowered speed (and pitch).
IMPORTANT NOTE: keep in mind that the players mentioned in this article will not detect the Concert Pitch of the source. A video that uses another Concert Pitch then the standard 440Hz standard will be re-pitched with the same amount as if it was in 440Hz. The real-time auto-pitching instructions as mentioned in this blog article work for 440Hz pitched videos. You could use a different Concert Pitch as well, if you prefer, but you do have to do “the math” yourself for it.
The larger part of this article describes how to setup the VLC player (version 2.2.4 “Weatherwax”) to work with video at 432Hz. The reason why I prefer the VLC player above any other, is because it’s available for all platforms (Windows, OSX and Linux), it is very accurate and can be “setup” in different ways … and it’s freeware. So, everyone can use it!
Alternatively, other multi-format video players that can be used with Windows are the “Natural Grounding Player” and “Foobar 2000” (less accurate) as described later in the article.
If you were just looking for real-time auto-pitching music (audio only) players, perhaps you like to read this article at Roel’s World!
VLC (VIDEOLAN) PLAYER
These instructions work for version 2.2.4 “Weatherwax”. Some visitors of my blog have mentioned having difficulties implementing these instructions with version 3 though.
I think the best freeware video player available for all platforms (Windows, OSX and Linux) is the VLC player. For this article I used VLC version 2.2.0 (Weatherwax). I do not know if all older versions have the required options and/or those settings can be found at the places as described in this article.
STEP 1: INSTALL VLC
If you hadn’t already installed the VLC player, then go to http://www.videolan.org/vlc/, download and install VLC.
STEP 2: CHANGE SETTINGS …
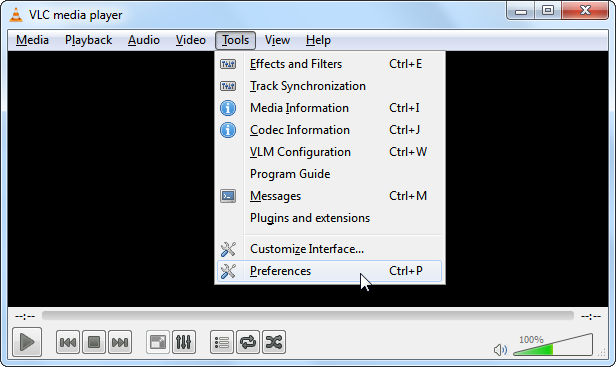
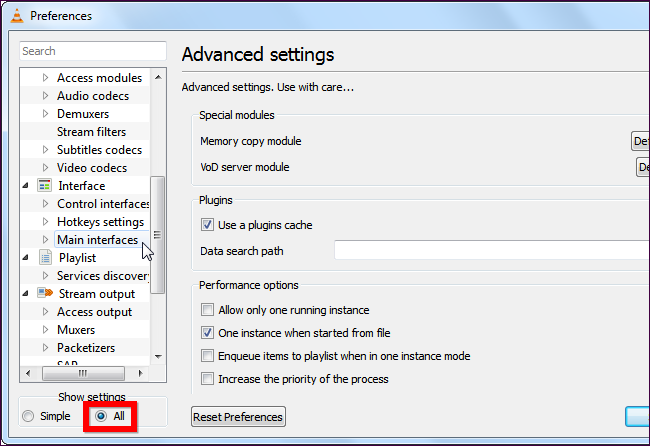
After starting VLC, go to: Tools > Preferences > select All at “Show settings” (see image below on the right).
STEP 3 – DISABLE PITCH EQUALISATION:
Select Audio from the settings menu and un-select “enable time stretching” at the bottom right. The pitch should now raise and lower in relation to the speed.
STEP (4 METHOD 1) – CHANGE THE PLAYBACK SPEED (ALLWAYS RE-PITCHING – A4≈432HZ):
If you want to watch/listen ANY AND ALL videos/music files and stream urls pitched down from 440Hz to 432Hz, then this is the best setup.
The best way to get the most accurate result is to edit the VLC configuration file “vlcrc“. The config file is created separately for every user account on the computer you use (there is no global configuration file). This method was suggested to me by Thiago Haendel. This is where you most likely should be able to find the config file:
LINUX & UNIX:
home/%username%/.config/vlc/vlcrc (v0.9.0 and above)
/home/%username%/.vlc/vlcrc (v0.8 and older)
MAC OS X:
HOME/Library/Preferences/org.videolan.vlc
HOME/Library/Preferences/VLC (v0.9 and older)
WINDOWS 95/98/ME: C:\Windows\Application Data\vlc\vlcrc
WINDOWS 2000/XP: C:\Documents and Settings\%username%\Application Data\vlc\vlcrc
WINDOWS VISTA: C:\Users\%username%\Application Data\vlc\vlcrc
WINDOWS 7/8: C:\Users\%username%\AppData\vlc\vlcrc
WINDOWS 10: C:\Users\%username%\AppData\Roaming\vlc\vlcrc
If you can not find the vlcrc file as listed above (for example because your operating system uses a different language), try locating it via the operating system file search for “vlcrc”.
Open the vlcrc file with a simple text editor (for example Notepad or Mousepad) and use the “Search” > “Find” option (Ctrl+F) to search for “Player Speed” (without the quotation marks). If you had not already changed the speed using method 3 (below), then you should find the following:
# Playback speed (float)
rate=1.000000
Now change rate=1.000000 to rate=0.981818
# Playback speed (float)
rate=0.981818
… and save the config file. Now you can listen and watch to video and audio files at A4≈431,999∞Hz.
STEP 4 (METHOD 2) – CHANGE THE PLAYBACK SPEED (PITCH IS SET BY SHORTCUT – A4≈432Hz):
If you do NOT want to watch/listen ANY AND ALL videos/music files and online streams pitched down from 440Hz to 432Hz – for example because part of your video/audio collection or online streams use another Concert Pitch then the standard 440Hz – then this is the best setup.
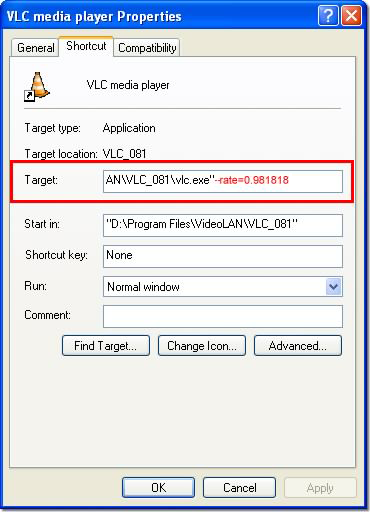
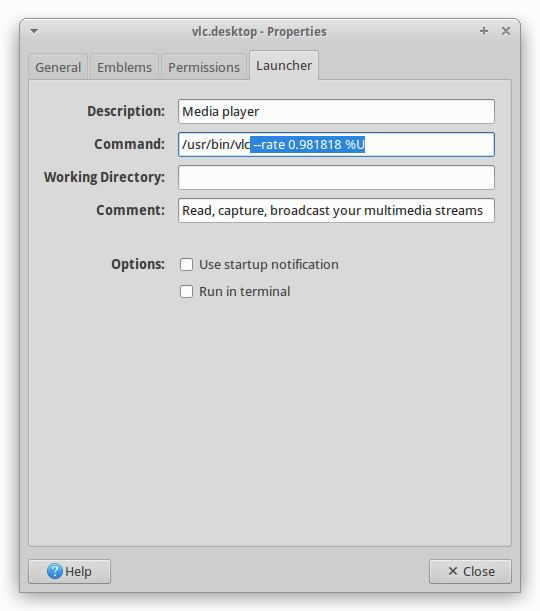
For this method you have to edit the application shortcut. If you use –rate attribute to the target / command line of the VLC player, the player will start-up with that Playback Speed set. Using this method will set A4≈431,999∞Hz
The “advantage” of this method is that the –rate attribute will “overrule” any and all Playback Speed configuration changes applied to VLC (method 1 and 3).
Note: Do keep in mind that when you start VLC by right-clicking an audio or video file, that the Playback Speed is set via the configuration settings (method 1 or 3). With other words, to use this method you have to start VLC with the shortcut and load the media files from the player or “drop” them into the playlist.
You could for example make several different shortcuts, with various rates for various purposes. If you for example like to use the “Scientific Pitch” at C4=256Hz, you could add –rate=0.978496 to the Target/Command and save the shortcut under a different name. Or, if you would like to listen to the modern Classical concert pitch at A4=442Hz, you could add –rate=1.004545 to the Target/Command. And –rate=0.000000 would set the player to play at the original speed.
This is how to set it up for re-pitching 440Hz media to 432Hz:
WINDOWS: ..\Program Files\ ..\vlc.exe”–rate 0.981818 LINUX: /usr/bin/vlc –rate 0.981818 %U
STEP 4 (METHOD 3 – LESSER) – CHANGE THE PLAYBACK SPEED (A4≈431.4HZ):
If you do not feel comfortable working with computers and you do not like editing the VLC config file or Target/Command line, then there is a 3rd method you could use. IMPORTANT: This method is less accurate when it comes to changing the pitch. You will not be able to setup VLC to play perfectly pitched to 432Hz, but to approximately 431.4Hz. This is how this works:
Select Input/Codecs from the settings menu and scroll down on the right side to “Playback control” and set the “Playback speed” to 0,98.
NOTE: The amount of speed change of 0,98 by the VLC player via the preferences menu is not as accurate as I would like it to be, VLC can only set the amount up to 2 digits behind the comma. 0,98 will set A4 to approximately 431.4Hz, a bit lower then 432Hz. 0,98 is as close as you can get with the standard VLC preferences.
Press the button “Save” at the bottom-right to safe the changes and close the window. Restart VLC to activate the changes.
VLC + YOUTUBE
To be able to watch youtubes with VLC, we have to activate the “Web Interface”. This is how you do that:
- After starting VLC, go to: Tools > Preferences > select All at “Show settings”.
- Select “Main interfaces” under “Interface” from the settings menu and select “web” on the right side.
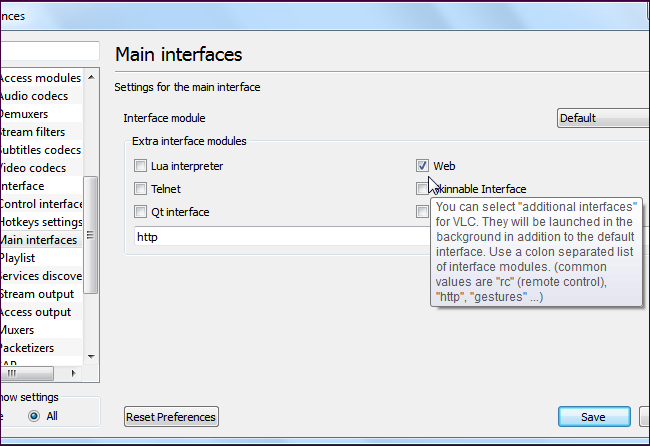
Press the button “Save” at the bottom-right to safe the changes and close the window. Restart VLC to activate the changes.
Note: If you use Windows you might be prompted by you firewall (if you use one) to give access to the net. Don’t be alarmed, this is normal, each time you start VLC, the web server will be started in the background.
*YOUTUBE PLAYLISTS
The standard VLC installation does not include Youtube Playlist support. So, in order to listen to Youtube Playlists, you have to install a “Playlist Parser”. The Youtube Playlist parser can be downloaded from the official VideoLAN Website: http://addons.videolan.org/content/show.php/+Youtube+playlist?content=149909. On this website you can find the installation instructions as well.
WATCHING YOUTUBE VIDEOS WITH VLC
- Copy the URL of the youtube video (for example: https://youtu.be/JHf33lh3k4A) or playlist* (must contain: playlist?list=). You can get the url by clicking the “Share” button under the youtube video.
- Start VLC, press Ctrl+N (Media > Open Network Stream)
- Paste the url then click on “Play” (or Alt+P then Enter)
… the youtube video / playlist* should start.
SUGGESTION: SAVE YOUR YOUTUBE PLAYLISTS AT YOUR COMPUTER!
If you like to listen to that playlist some other time again, then I suggest you save the playlist. This way you do not even have to start/use your browser. You can save the playlist by pressing Ctrl+Y (Media > Save Playlist to File).
FOOBAR (WINDOWS APPLICATION) + YOUTUBE (AUDIO ONLY) AT A4=432HZ
For those who prefer using Foobar for watching and/or listening to Youtube videos: Foobar 2000 can be setup to deal with Youtube streams as well.
NOTE: Foobar is though less accurate then the VLC setup as mentioned in this article
The only “advantage” Foobar has in comparison with VLC is that you can install this application also onto a portable device, like for example a Flash Drive. Then you can play the music on any another PC/Laptop running Windows, without having to install the program on another PC/Laptop first.
For Foobar installation instructions check this Roel’s World article!
TURNING FOOBAR INTO A VIDEO PLAYER:
After the Foobar installation (including the SoundTouch plugin) you need to download the Youtube component for Foobar 2000 here: http://fy.3dyd.com/download/.
You can choose from 3 different versions, a standard version and 2 preconfigured versions (detailed information can be found on the fv.3dvd.com site). The difference is in default component settings. Standalone variant configured to play best quality from the formats which foobar2000 can play out of the box and without problems. Variant preconf_audio configured to use wider set of formats which can be played without problems only using 3rd party plugins which it contains. Variant preconf_video also has needed DirectShow filers to be able to play video without need to install them in the system.
INSTALLATION STEPS:
- Go to the Components page.
- Click the “Install…” button and select the component archive, or simply drag it to the list.
- Press “OK”, you will be prompted to restart foobar2000 in order to load the newly installed component.
NATURAL GROUNDING PLAYER (WINDOWS APPLICATION)
The Natural Grounding player was created by Etienne Charland as tool to be used for Natural Grounding Meditation (“a fun and SIMPLE form of meditation that works especially well for men because it gets you in direct relation to female ‘shakti’ or ‘yin’ energy.”).
Besides being useful for meditation, it can be used as well to listen to music and watch videos pitched to 432Hz and that’s why it deserves to be mentioned in this article as well.
This player does not only play videos, it can download, upscale, re-encode and convert Youtube videos (using a combination of AviSynth, ffmpeg and x264) as well. The “Powerliminals” Player allows playing 10, 20 or even 30 audios simultaneously at various speeds. It’s Audio Video Mixer allows changing file containers, merging audio/video streams from separate files, and joining multiple video files of same format without re-encoding. All operations are lossless. You can download the Natural Grounding Player here:
https://sourceforge.net/projects/naturalgroundingplayer/files/
Read more about how to install and use this player at the Natural Grounding Player page at Github
Warning: when upgrading from an earlier version to version 1.4 the player will replace your existing database. To preserve your custom videos, mark them as “Personal” in the playlist and export them to a file. You’ll be able to re-import them after installing the 1.4 version. To preserve your existing video files, before upgrading, use “Playlists | Moves Files” to move all files to their default locations. Reed more about this here.
